
AI Bill Scan
Scan supplier purchase invoices using your phone camera or upload invoice files, review scanned drafts, map column headers, and import medicines into your purchase bill.
The AI Bill Scan feature allows you to add medicines to a purchase bill by scanning a supplier invoice instead of entering each medicine manually.
You can capture an invoice using your phone's camera or upload invoice files for MediFlux to scan and extract the medicine details.
Once the invoice is processed, you can review the scanned items, map the invoice columns to MediFlux fields, and import the medicines into the Add Purchase form.
Navigate to Purchases → Add Purchase and click Scan at the top-right.
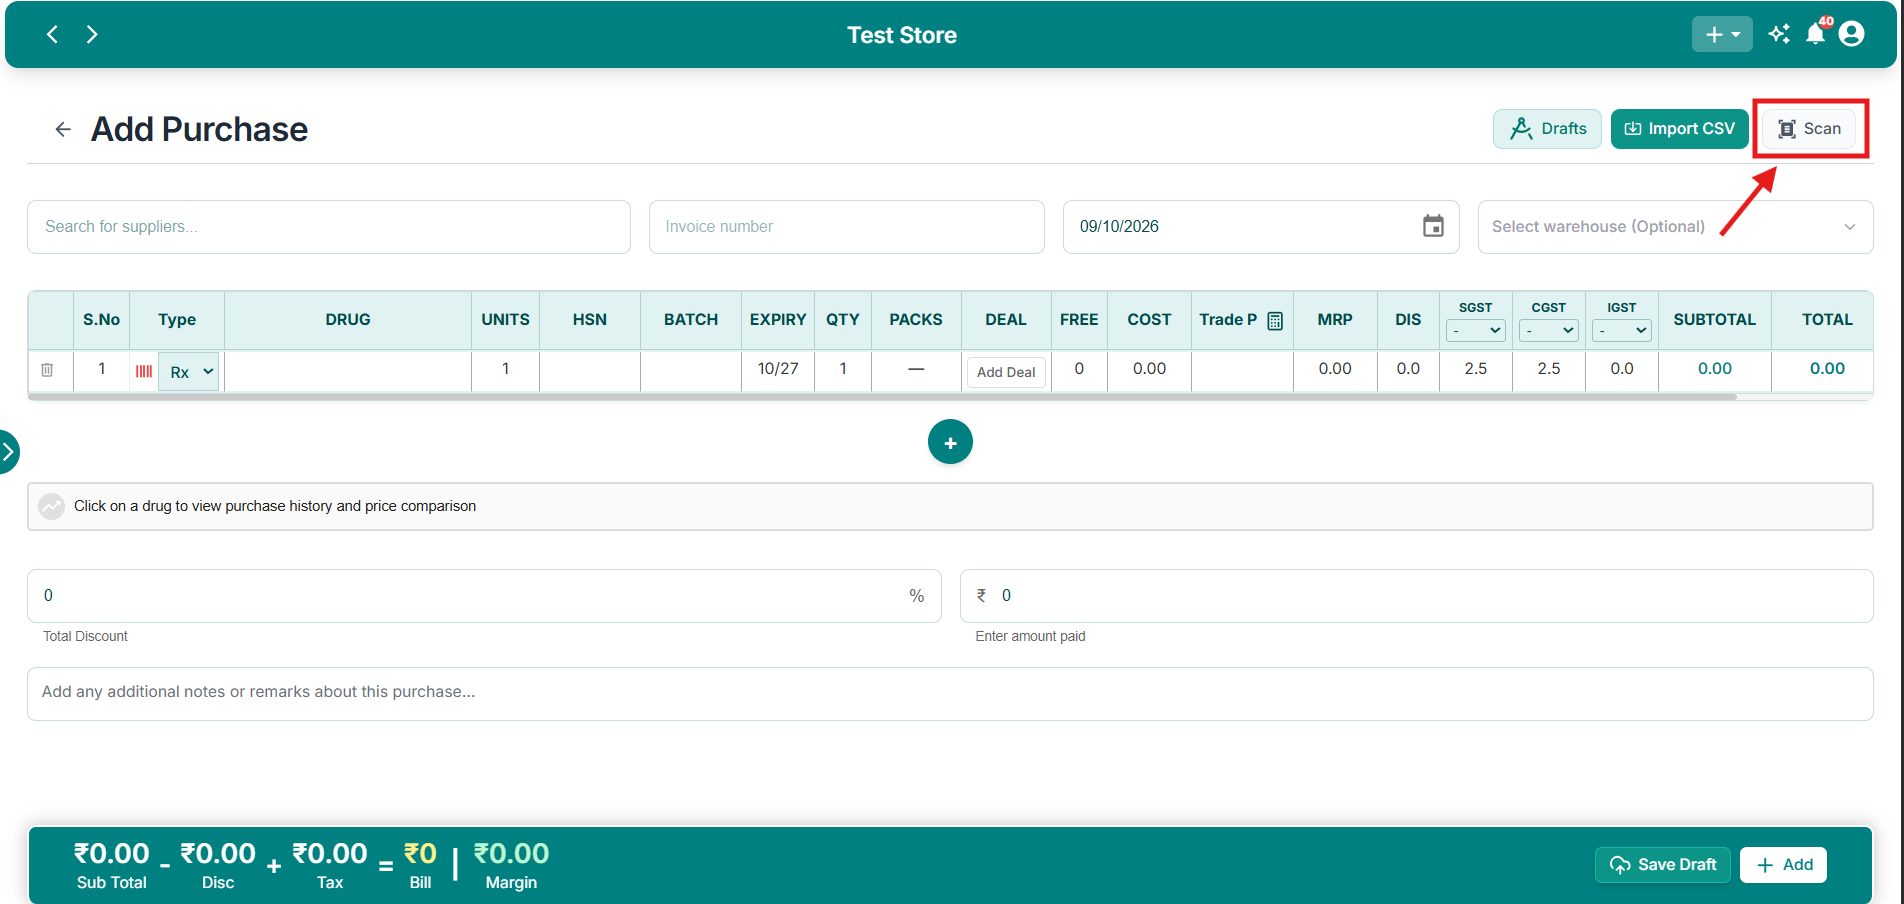
Scan option on Add Purchase
The Add Purchase page provides Scan, Import CSV, and Drafts options for entering purchase data.
Available Scanning Methods
Click Scan to open the Scan Invoice dialog.
MediFlux provides two options depending on the device you are using.
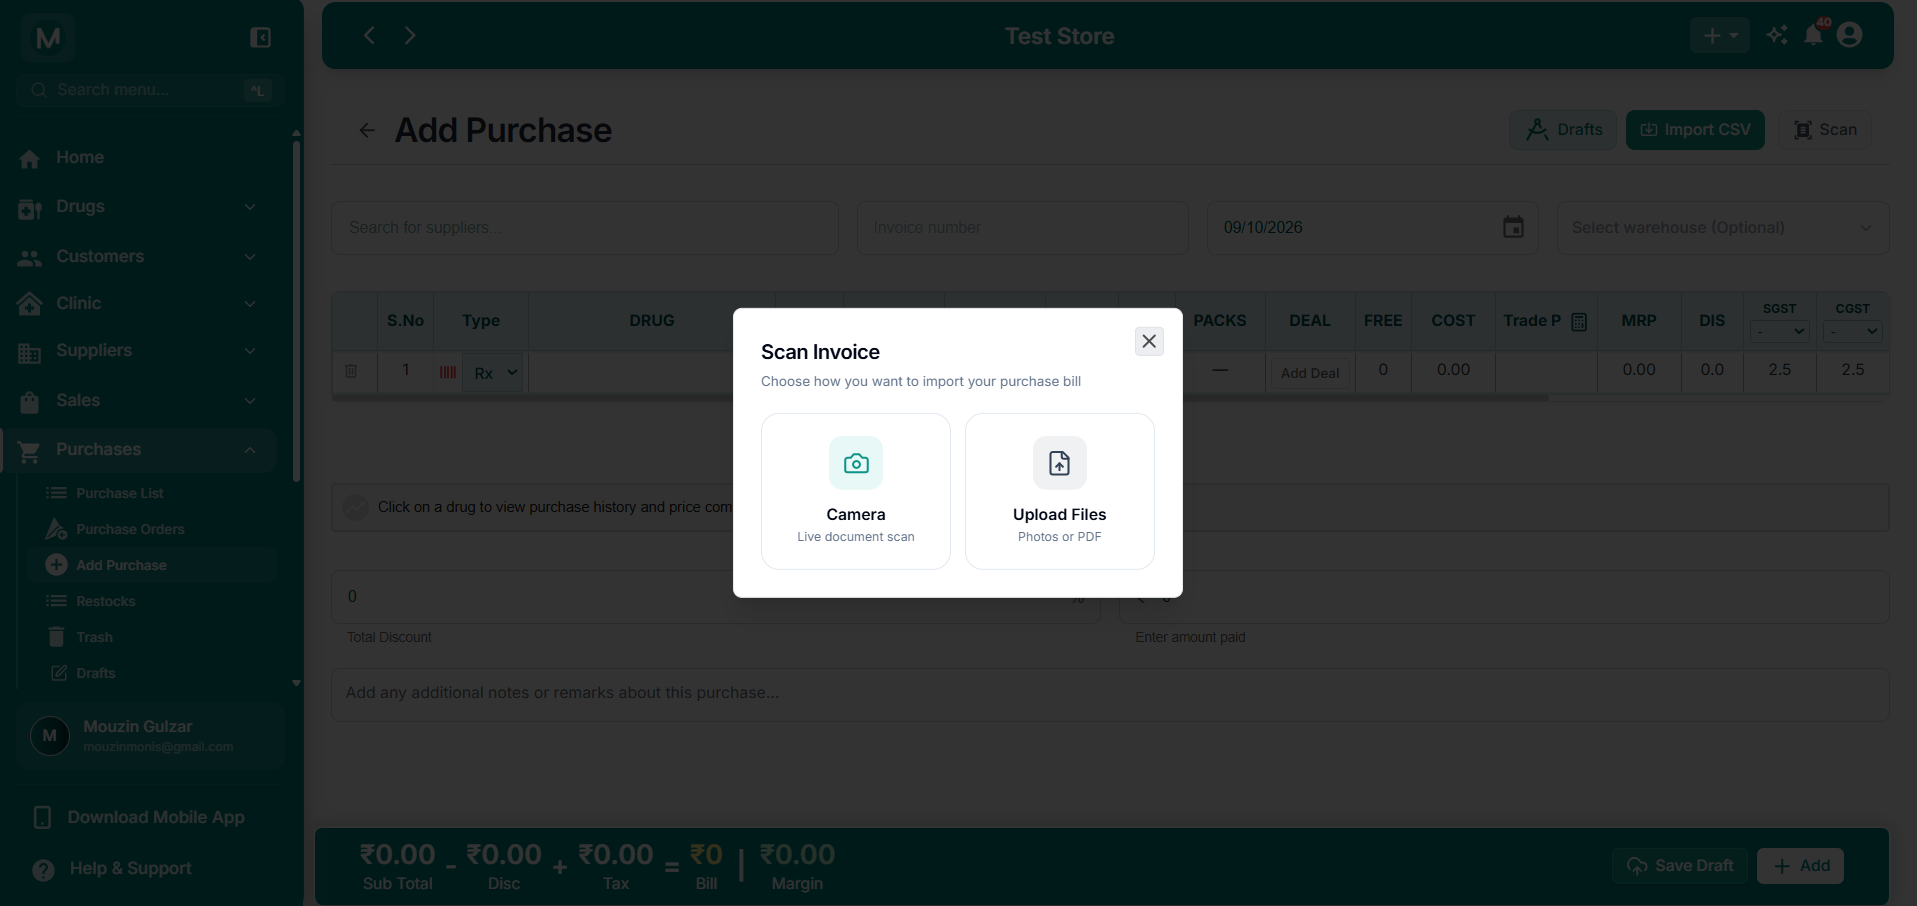
Scan Invoice options
Choose Camera for a live document scan or Upload Files to select invoice photos or PDFs.
On phones and tablets, you can use both Camera and Upload Files. On desktops and laptops, only Upload Files is available.
Method 1: Scan Using Your Phone Camera
Use the Camera option when you have a physical supplier invoice and want to scan it directly.
Open Add Purchase
Go to Purchases → Add Purchase on your phone or tablet.
Open the scanner
Click Scan and select Camera.
Allow camera access if your device requests permission.
Capture the invoice
Position the supplier invoice within the camera view and capture it.
Make sure the medicine names, batch numbers, quantities, prices, and other details are clearly visible.
Wait for processing
After capturing the invoice, MediFlux processes the scanned document.
The scanned invoice is available through Purchase Drafts while you continue the import workflow.
For better scanning results, place the invoice on a flat surface, use sufficient lighting, and make sure the entire invoice is visible and readable.
Method 2: Upload Invoice Files
Use Upload Files when you already have a digital copy or photograph of the supplier invoice.
This is the available scanning method on desktops and laptops.
Open Scan Invoice
Navigate to Purchases → Add Purchase.
Click Scan at the top-right.
Select Upload Files
In the Scan Invoice dialog, select Upload Files.
This option accepts invoice photos or PDF documents.
Upload the invoice
Choose the invoice file or files from your device.
MediFlux processes the uploaded documents to extract the purchase details.
Access the scanned draft
Open Drafts to check the uploaded invoice and its processing status.
Scan and Import CSV are separate features. Use Scan for invoice photos or PDFs. Use Import CSV when importing purchase data from a structured CSV file.
Purchase Drafts
When you upload or scan a purchase invoice, it is stored in Purchase Drafts while the document is being processed.
This allows you to access the scanned invoice and continue working with it once processing is complete.
Click Drafts at the top-right of the Add Purchase page to open the Purchase Drafts panel.
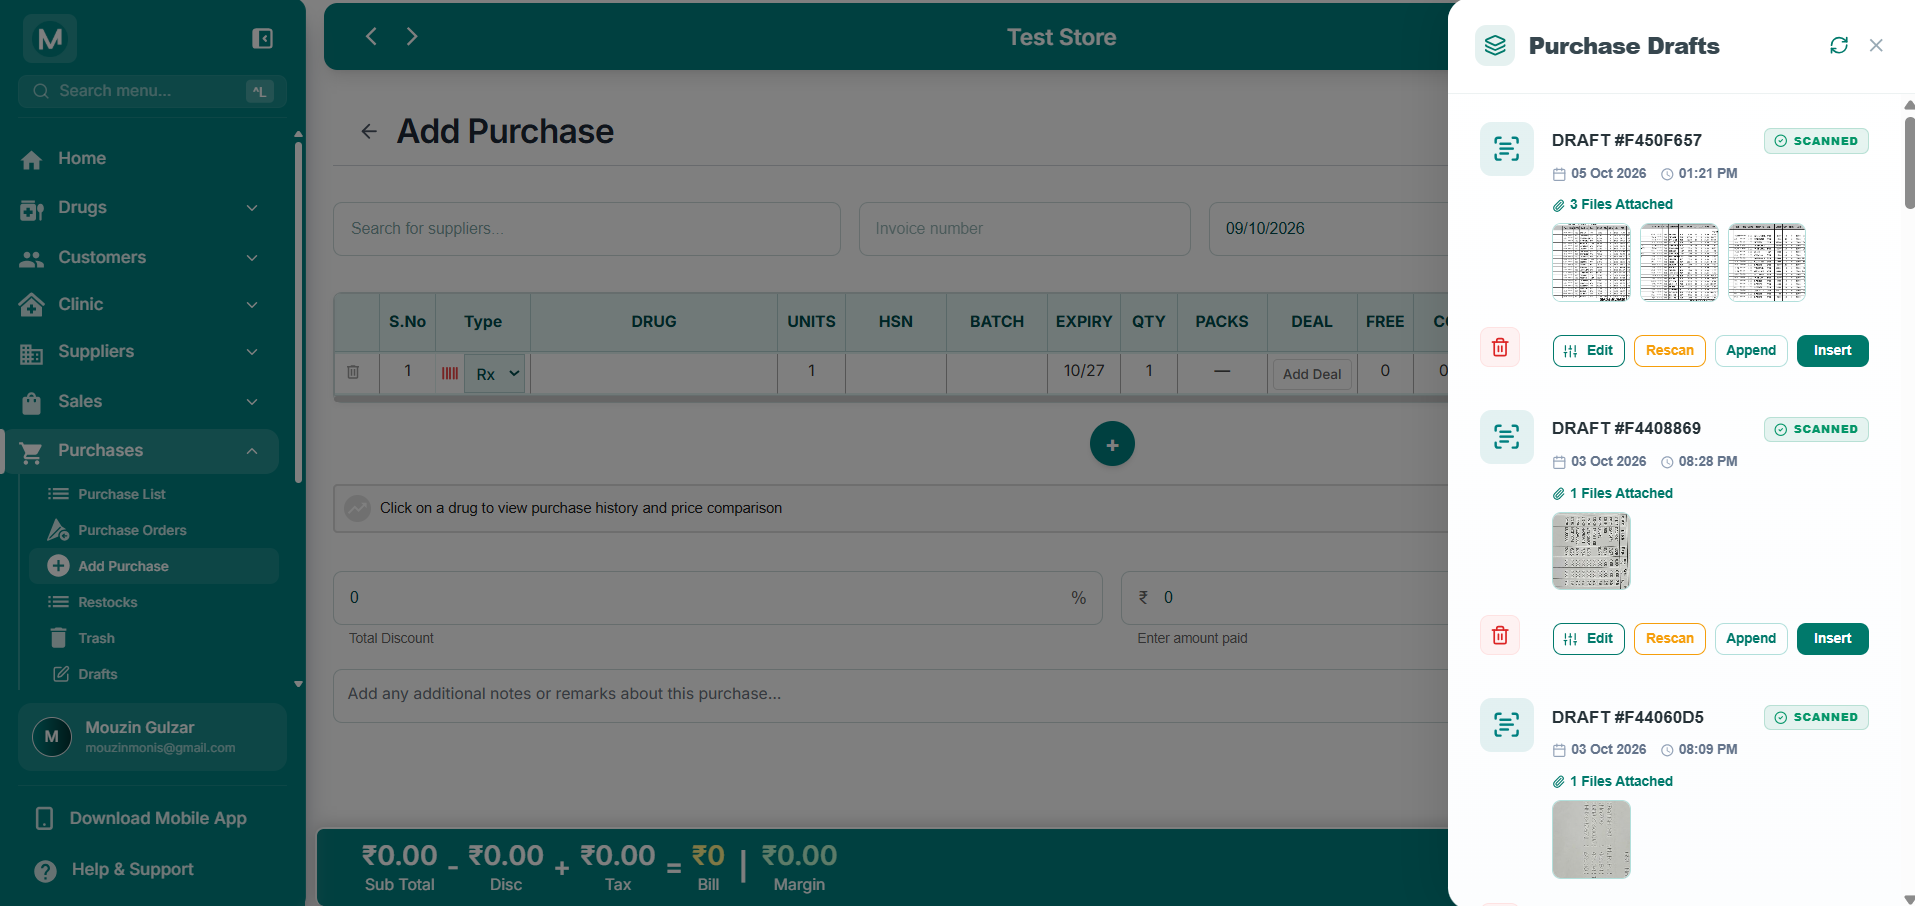
Purchase Drafts panel
View scanned purchase drafts, processing status, attached invoice files, and available draft actions.
Understanding the Draft Information
Each scanned draft displays information such as:
Once a draft has been scanned, you can review it and choose how to proceed.
Available Draft Actions
Review before deleting
Deleting a draft removes it from the Purchase Drafts list. Make sure you no longer need the draft before using the delete option.
How to Continue a Scanned Draft
Open Purchase Drafts
Click Drafts from the Add Purchase page.
Find your invoice
Locate the draft using its reference number, date, or attached invoice previews.
Check that its processing status shows Scanned.
Review the available actions
You can use Edit, Rescan, or Append if the scanned draft needs further changes.
Select Insert
When the scanned invoice is ready, click Insert.
MediFlux opens the Map Invoice Headers dialog.
Map Invoice Headers
Before importing the scanned medicines, you must review how the invoice's column headings are mapped to the corresponding fields in MediFlux.
Supplier invoices may use different column names for the same information.
For example, one invoice may use Product Description while another uses Item Name.
The Map Invoice Headers step ensures the extracted information is assigned to the correct purchase fields.
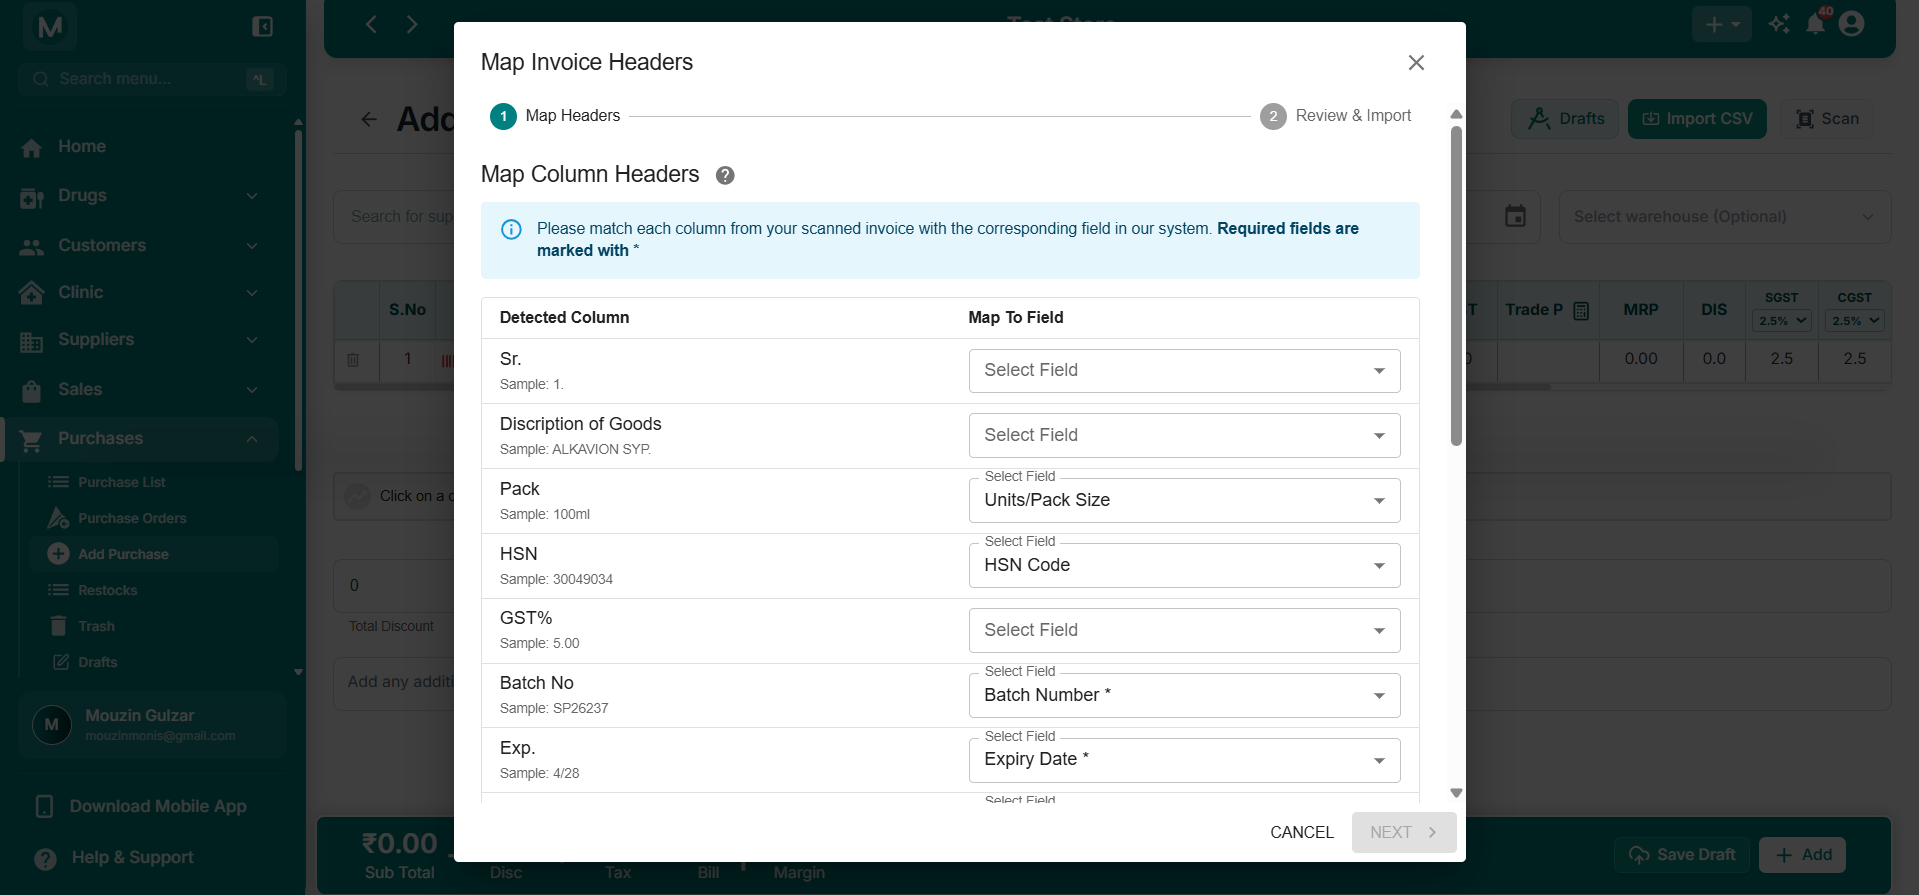
Map Invoice Headers
Match detected invoice columns with the corresponding MediFlux fields before importing.
Understanding the Mapping Table
The mapping dialog displays two columns:
For each detected column, select the correct field from the Map To Field dropdown.
Common Header Mappings
The exact detected column names depend on the supplier's invoice.
Check required fields
Fields marked with * are required. Make sure they are mapped correctly before continuing.
Pay particular attention to Drug/Product Name, Quantity, and Batch Number, as incorrect mapping can lead to incorrect purchase entries.
How to Map Invoice Headers
Review detected columns
Check each column name detected from the invoice.
Use the sample value shown below the column name to understand what information it contains.
Select the correct MediFlux field
Open the Map To Field dropdown and select the matching field.
For example:
- Map
Product Descriptionto Drug/Product Name - Map
Qtyto Quantity - Map
Batchto Batch Number - Map
HSNto HSN Code
Check all required mappings
Scroll through the mapping list and make sure all required fields have been assigned correctly.
Continue to review
Click Next to open the Review & Import step.
Review Scanned Items Before Importing
After mapping the invoice headers, MediFlux displays the Import Scanned Items dialog.
This is the final review step before adding the extracted medicines to the purchase form.
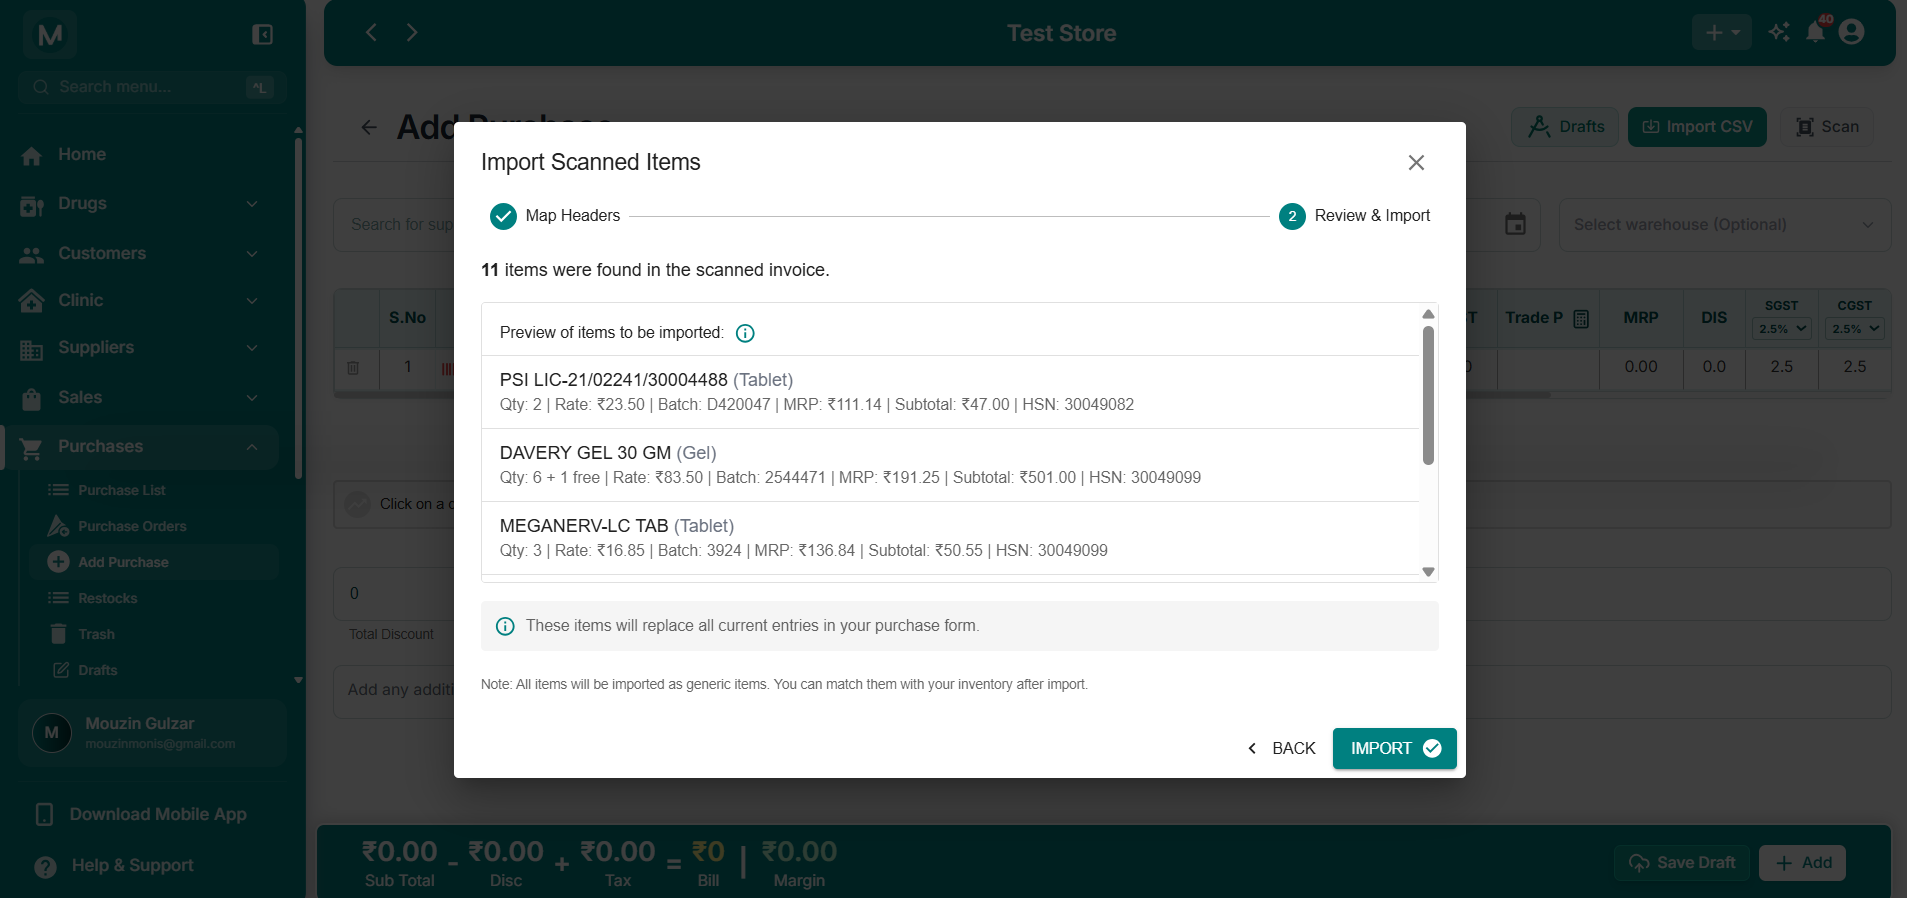
Review scanned purchase items
Preview extracted medicines, quantities, rates, batches, MRP, subtotals, and HSN codes before importing.
What You Can Review
The dialog displays the number of items found in the scanned invoice and a preview of the extracted medicines.
Depending on the invoice, the preview can include:
For example, a scanned invoice might contain:
Review the extracted details carefully before importing.
Important: Existing Purchase Rows Will Be Replaced
Import replaces current purchase entries
Importing the scanned items will replace all current entries in the purchase form.
If you have already entered medicines manually, review them before continuing with the import.
Generic Items After Import
Scanned medicines are initially imported as generic items.
You can match them with medicines in your existing inventory after importing them into the purchase form.
Importing scanned items does not automatically mean every medicine has been matched with an existing inventory record. Review and match the imported medicines as needed.
How to Import Scanned Items
Review the extracted medicines
Check the medicine names, quantities, rates, batch numbers, and other extracted details.
Go back if corrections are needed
If the column mappings are incorrect, click Back to return to Map Invoice Headers.
Correct the mappings and continue again.
Confirm the import
Once the extracted data looks correct, click Import.
MediFlux inserts the scanned medicines into the Add Purchase table.
Review the Imported Purchase Bill
After importing, the extracted medicines appear as rows in the Add Purchase table.
You can review the imported values before saving the purchase.
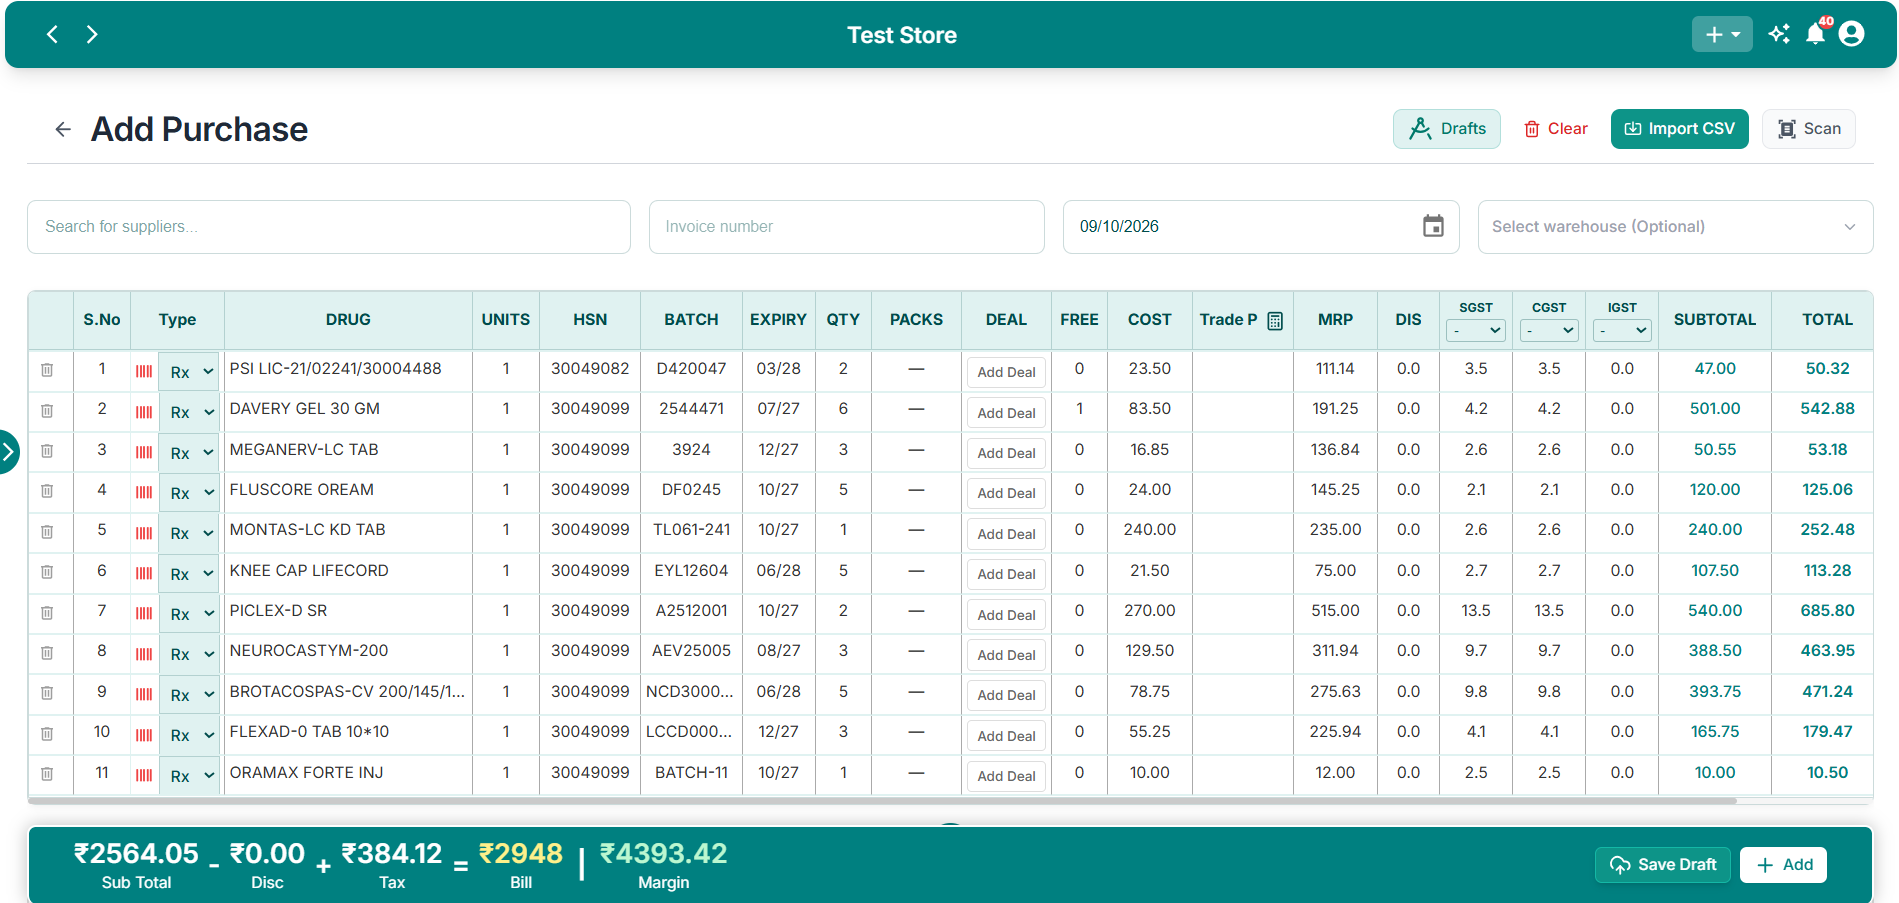
Imported medicines in Add Purchase
Scanned medicines populated in the purchase table with drug names, batches, expiry dates, quantities, prices, tax rates, and totals.
What to Check After Importing
Review the following information:
You should also review the supplier, invoice number, invoice date, and warehouse selection before saving the purchase.
Complete the Purchase
Select the supplier
Choose the supplier associated with the scanned invoice.
Enter invoice details
Enter or verify the invoice number and purchase date.
Select a warehouse if the purchase should be assigned to a particular warehouse.
Review the imported medicines
Check all imported medicine rows and correct any information that needs updating.
Match generic items with your inventory where applicable.
Review the bill summary
At the bottom of the page, review:
- Sub Total
- Discount
- Tax
- Bill
- Margin
Save the purchase
Click + Add to record the purchase.
Alternatively, click Save Draft if you want to complete it later.
Complete Purchase Scanning Workflow
The complete process follows this order:
Scan or upload
Open Purchases → Add Purchase → Scan.
Use Camera on a phone or tablet, or Upload Files to upload invoice photos or PDFs.
Wait for the scan
The uploaded invoice is stored in Purchase Drafts while processing.
Open the scanned draft
Once the draft is scanned, open Drafts and locate the invoice.
Use Edit, Rescan, or Append if needed.
Insert the scanned invoice
Click Insert to continue with the import.
Map the headers
Match the detected invoice columns with the correct MediFlux fields.
Click Next.
Review and import
Check the extracted medicine details.
Click Import to populate the purchase table.
Verify and save
Review the imported medicines, purchase details, and totals.
Click + Add to save the purchase.
Important Things to Remember
- Camera and Upload Files are both available on phones and tablets.
- On desktops and laptops, use Upload Files.
- Scanned invoices are available through Purchase Drafts while processing.
- A scanned draft can be edited, rescanned, appended to, inserted, or deleted.
- Always review Map Invoice Headers before importing.
- The Review & Import step lets you check the extracted medicine details.
- Importing scanned items replaces the existing medicine entries in the purchase form.
- Imported medicines are initially treated as generic items and can be matched with inventory afterward.
- Review all medicine details, tax rates, and purchase totals before saving.